To connect to a data source using iReport you need to configure the Data source. To do that go to Dataà Connection/Data Sources From the Main Menu items.
You would get the Connection/Data Sources Window. Click “New”
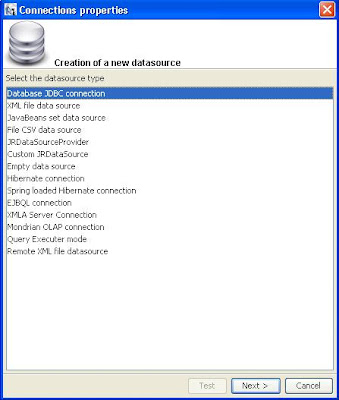
Most of the time you would be using a JDBC data source or a Hibernate Connection. For the sake of the first report we will look at the much simpler and common way of using a JDBC connection. To configure a JDBC connection click “JDBC Connection” and click “Next”
To connect to a MySQL or a Oracle Database first you need to define a Driver. While iReport comes with a lot of dirvers it for some strange reason does not include an Oracle Driver.
Connecting to MySQL
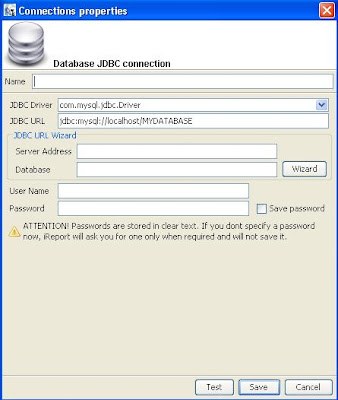
Set your server path and data base name in the JDBC URL Wizard. Then Click Wizard and it will automatically set your JDBC URL. Make Sure you have selected the com.mysql.jdbc.Driver and Type the User name and password to the database and click Test.
Your Data base connection should be working properly. If not check your MySQL database URL is correct or/and the database server is running properly. If the test is Successful click Save.
Connecting to Oracle Database.
As I mentioned above iReport does not have a Oracle JDBC driver included. To Connect to Oracle you need to have a Oracle JDBC Driver compliant with your Oracle Version. They can be found here. I’ve used ojdbc14.jar with Oracle 9i and 10i.
Place the Oracle JDBC Driver in your lib directory. If you have installed using the default settings this would be in the c:/Programfiles/jaspersoft/ireport2.0.5 directory
Set your Server Path and the database name in the JDBC URL wizard. Then click “Wizard” button and the Database URL would be set WITH THE PORT 1521. If you are not using that simply modify it to the port u are using in the JDBC URL Field. Type the User name and password to the database.
Set the JDBC Driver Field to “oracle.jdbc.driver.OracleDriver” and click test. If not successful check your username/password and Database URL and Try again. After the test is successful click Save.
Now you are ready to start designing a report.
UPDATE on 08 Dec 2010
A Better Example Through Comments (@author prakash)
Steps to set the Classpath for iReport:
1) go to "Tools / Options" menu and select iReport
2) verify that database JDBC driver is present:
- Choose "Classpath" tab
- Click "Add JAR" and then locate the mysql.jdbc.Driver
- Click "OK"
3) click "Connections / Datasources" icon in toolbar
5) click "New" and set up a "Database JDBC Connection" using driver from step 2
6) click "Test" to verify the data source works correctly
7) click "Save" to save the data source


